
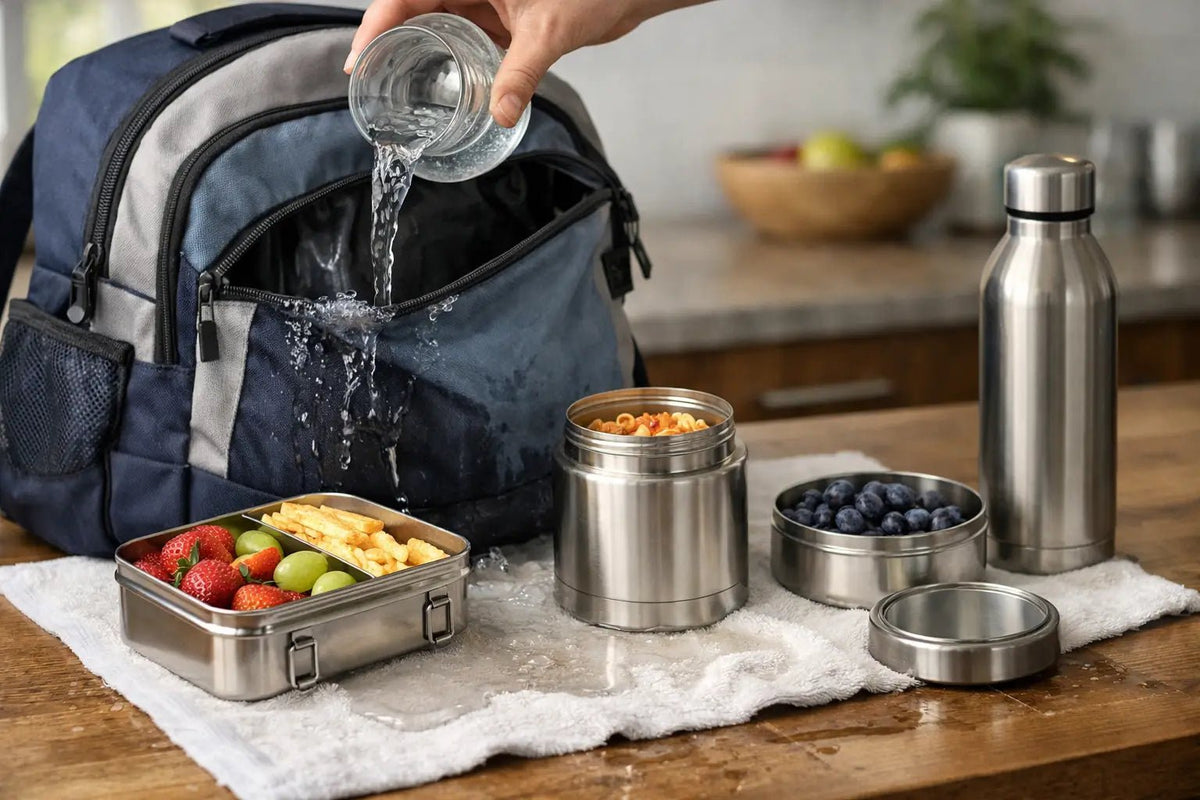
A school bag leak test example is most useful when it copies the moment that usually causes the problem: a packed lunch tipped sideways between a reader, a drink bottle and a school jumper. A container may look secure on the kitchen bench, yet leak when it is pressed, turned or carried upside down. Testing it at home takes only a few minutes and can save a soggy bag, ruined homework and an unhappy child at lunchtime.
The aim is not to force a container beyond its intended use. It is to check whether the lid, seal and clips are correctly fitted and suitable for the wetter foods you plan to pack. For busy families, that small check can make the morning routine far more reliable.
A simple school bag leak test example
Choose the container you would normally use for yoghurt, hummus, salad dressing, stewed fruit or another wet lunchbox item. Make sure it is clean and completely dry, especially around the rim and sealing edge. Water on the outside can make it difficult to tell whether there is a genuine leak.
Fill the compartment or container with cool water to the level you would realistically fill it with food. Do not overfill it. Most leaks happen because food is packed above the recommended line, stopping the lid from sitting flat. Leave a little space at the top, then close the lid carefully according to its design.
Place a dry paper towel around the outside of the closed container and put it inside a school bag. Add the everyday items that create pressure, such as a lunch bag, book, spare clothing or pencil case. Close the bag, then turn it on each side and upside down for around 30 seconds at a time. Give it a few gentle shakes, similar to the movement of walking to school or travelling in the car.
Take the container out and inspect the paper towel, the lid edge and the inside of the bag. If everything is dry, the container has passed a practical first test. If water appears around one corner or beneath the lid, check that the seal is clean, properly seated and free from food residue before testing again.
A second test is worthwhile if you pack a particularly runny food. Leave the filled container on its side in the closed bag for 10 to 15 minutes. This gives water time to find a small gap that a quick shake may not reveal.
Why a bench test is not enough
A lid can seem perfectly secure when a container stays upright. School bags do not cooperate with that neat setup. They are dropped beside desks, wedged into lockers, tipped in the car and carried at angles. Pressure from other belongings can also flex a lid or push food into the sealing area.
That is why the bag itself should be part of the test. It recreates the conditions your child’s lunch will actually face, without the risk of wasting a packed meal. It also helps you decide where the container should sit. A wet-food container is generally best packed flat, with the lid facing upward where possible, rather than balanced on its edge beside a heavy drink bottle.
There is a trade-off here. Even a genuinely leakproof container needs to be closed correctly and used within its intended purpose. A container designed for dry snacks may be ideal for crackers and berries but not for soup or thin dressing. Checking the product guidance before packing liquids is always sensible.
Test the seal before blaming the container
Many apparent leaks are caused by small packing or cleaning issues. A crumb, grain of rice or smear of yoghurt caught on the rim can create a channel for liquid to escape. A silicone seal that has not been pressed fully into place can do the same.
Before repeating your test, wash and dry the lid and container rim, then run a finger around the seal. It should sit evenly, without twists, stretches or gaps. Close the lid on a level surface and check that any clips are fully engaged. If the lid needs a firm press in one area, do that before it goes into the school bag.
It also pays to look at portion size. Soft foods can spread into the lid when a compartment is packed too full. Packing slightly less, or choosing a separate sealed container for wetter items, often solves the problem immediately.
Use water first, then test real lunch foods
Water is clean, easy to see and safe to test with, so it is the best starting point. But some foods behave differently. Thick yoghurt may cling to the lid; dressing can be oily; juicy fruit may release liquid during the day. Once your container passes the water test, test it with a small amount of the food you plan to send.
For yoghurt or dips, fill only to a sensible level and keep the container upright overnight in the fridge. The next morning, place it in the bag and repeat the sideways test. This is particularly helpful before the first week of term, when you are working out which lunch combinations suit your child’s bag and routine.
Avoid using hot liquids for a school bag test unless the container is specifically designed and approved for them. Heat and pressure can change how a lid behaves. Cold foods are the usual school-lunch use case and give you the most relevant result.
Packing habits that reduce leaks
A good leak test works best alongside a few simple habits. Keep wet foods in containers intended for wet foods, and keep dry items separate where practical. This protects sandwiches, crackers and fruit if a lid is opened before lunch.
For school lunches, it helps to pack the heaviest item at the bottom of the bag and place containers flat rather than on their sides. Encourage children to close lunchbox lids fully after eating too. A container that travels home with leftover yoghurt can cause just as much mess as one packed in the morning.
If your child uses a lunch bag with an insulated section, check how much pressure the zip and surrounding items place on the container. A tight fit is not always a better fit. There should be enough room for the lid to remain level and for your child to remove it without pulling or twisting it.
When a container does not pass
If your school bag leak test shows moisture, do not keep relying on hope and a folded paper towel. Start by checking for a misplaced seal, a dirty rim, overfilling or a lid that has not clicked into place. These are common and easily fixed.
If the issue continues, inspect the lid and seal for damage. Cracks, warped edges and worn seals can affect performance over time. It may be time to replace the seal or choose a container better suited to the food being packed. This is also where quality matters: durable 304-grade stainless steel containers can handle daily family use well, while the lid and seal still need regular care.
Meals In Steel designs its food storage range for real routines, including school bags that are rarely carried gently. Choosing a well-made option with a secure lid, then testing it with your own child’s bag, gives you much clearer confidence than a label alone.
A quick check before the school week
You do not need to repeat a full test every Sunday night. Once a container has passed with the foods you normally pack, a quick visual check is enough before each use. Make sure the seal is clean, the lid sits flat and the portion leaves room to close properly.
For a new container, a new seal or a new lunch food, repeat the simple water test. It is a small habit that helps keep school bags dry, lunches appetising and weekday mornings one step calmer.


Leave a comment
This site is protected by hCaptcha and the hCaptcha Privacy Policy and Terms of Service apply.